Microscope Overview
Here is a simplified introduction to an optical microscope. If you want to learn more I recommend starting at the Wikipedia page for optical microscopes.
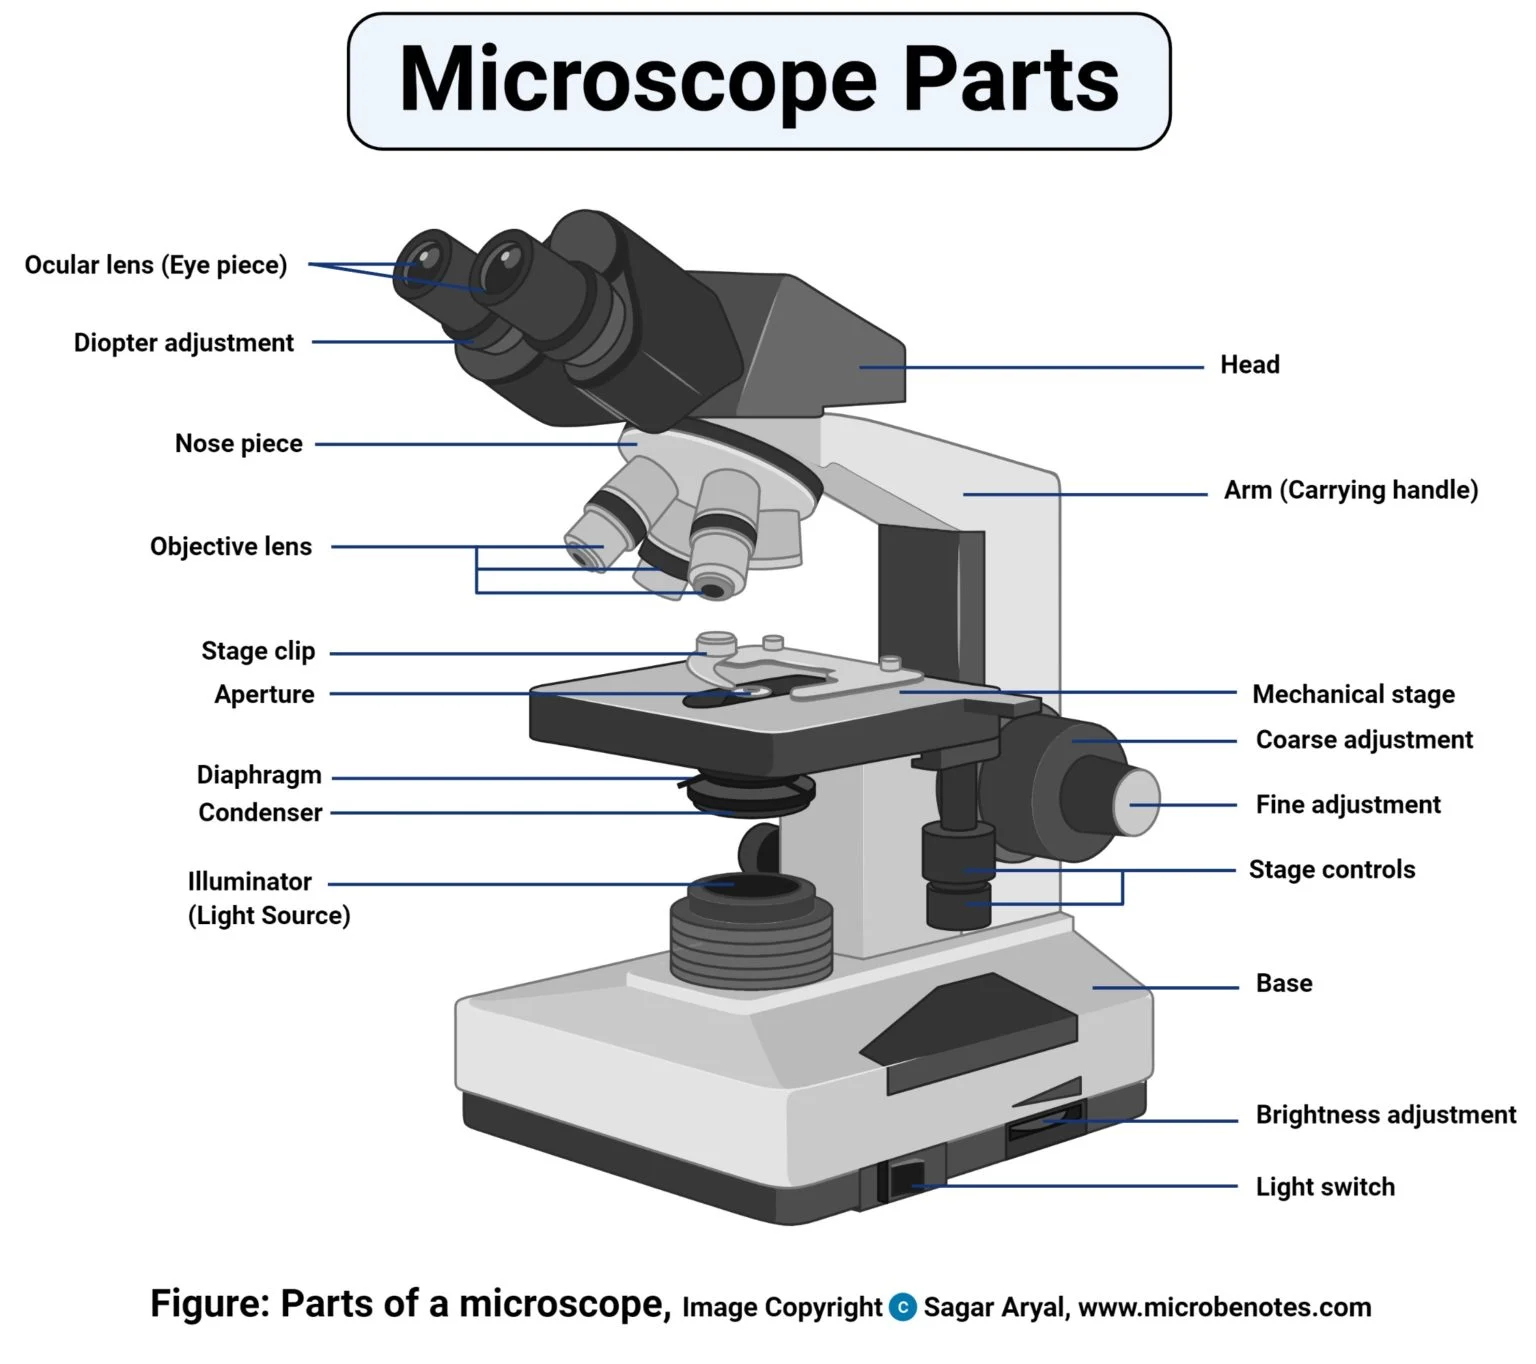
The below diagram provides a good overview of the parts of an optical microscope. This is pretty standard for a modern decent microscope. Your microscope may only have one ocular lens (which is totally fine), or it may have some of the controls in different locations. Please be sure to familiarize yourself with your microscope and the locations of its adjustments and controls. In practice they all function the same. If you read the Materials page you will see this is a good representation of the type of microscope that I recommend you acquire.
Quick How-to Use:
- Load your prepared sample onto the stage. Ensure that the stage clip is holding it firmly before proceeding.
- Turn on the microscope light source.
- Center the viewing area you want to start with over the light source using the stage controls.
- Start with the objective lens that is 10X or about there. Starting total magnification (see How magnification works below for more information) at 100X. This will allow you to clearly focus the whole sample using the course and then fine adjustment knobs. Be sure to adjust the brightness, condenser height, and diaphragm as needed. I get into more details on the last part in the Wet Mount Viewing page.
- After you have focused on your sample at the lower magnification now you can 'zoom' in with the higher magnification objective lenses. Be sure to refocus and adjust the diaphragm and condenser as you do this to produce optimal clarity.
- Take notes of what you are seeing. You can usually use a cell phone through the eyepiece to take a photo. See Sample Identification and Medical References for more information on what your sample can possibly tell you.
How lighting your sample works
The primary light source will come from below the mechanical stage via a LED or incandescent bulb (see my comments regarding my recommendations on the light source here). Some microscopes use a mirror that reflects the light up to the stage. There is a brightness adjustment (typically on the bottom side) that will change the intensity of the light being immitted from the light source.
The light is then focused through the condenser and diaphragm. These together focus the light on the sample to provide as clear of an image as possible. There are upper limits on how much optical microscopes can magnify an object clearly and this has to do with the wavelength of light. This is a little too complex of a topic for this tutorial so I wont go into details but thought its worth mentioning.
The condenser is a lens and the diaphragm is an aperture that helps adjust the depth of field and contrast, similar to how the aperture works on a camera. You can usually adjust the condenser by moving it closer or further from the stage with an adjustment knob and the diaphragm typically has a slide lever that allows you to adjust how open or closed it is. I go into more detail on where to start with these and how to adjust them with each objective lens on the Wet Mount Viewing page.
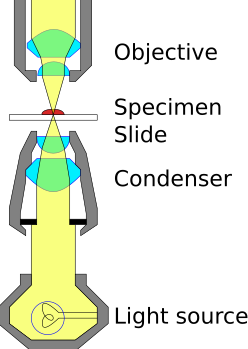
*image source wikipedia
How magnification works
Magnification is pretty straight forward to calculate.
So, for example you have your microscope set to use a 40X objective lens and the eyepiece is a 10X eyepiece then your total magnification is equal to 400X.
Some microscopes have swappable eyepieces that can increase the magnification. Usually standard eyepieces are 10X and the alternative is 20X. I recommend you start with 10X and stick with it. We don't really need to zoom in beyond the total magnification of 400X range. Going beyond 1000X magnification yields no benefit to us and in fact wont provide you with any more information as you are reaching the upper limits of what is visible due to the diffraction limit of light. I mentioned this earlier but just repeating it so you don't feel like its necessary to do so.
Adjusting the focus and navigating the sample
This is fairly self-evident but to adjust the focus on the sample you will use the course and fine adjustment knobs that will raise and lower the sample on the stage. This will move it along that path of light and allow you to focus on different parts of the slide and sample. I go into more details on Wet Mount Viewing.
Using the stage control knobs to move the sample around to view different parts of it. Again fairly straight forward but the image is inverted so it may take some getting used to as it can be a little counter intuitive. If your microscope doesnt have stage controls thats ok you will move it with your hands just be careful to not bump the slide cover or hit your objective lens (the lenses get very close to the sample when viewing).